Picture sinking your teeth into a delicate pastry shell, bursting with the vibrant sweetness of fresh fruits, each bite offering a symphony of flavors that dance on your palate. Fruit tartlets are not just desserts; they are little masterpieces that evoke sunny picnics and cheerful gatherings, each one a promise of joy wrapped in crispy golden crusts.
I can still remember the first time I helped my grandmother whip up a batch of these delightful treats in her cozy kitchen, where the air was filled with laughter and the intoxicating aroma of baking. Whether it’s a summer barbecue or a simple family dinner, serving fruit tartlets always brings smiles and creates unforgettable moments, making every occasion an adventure for your taste buds.
Why Will You Keep Making Fruit Tartlets?
Deliciously light and refreshing, these mini tarts are a burst of flavor in every bite. Quick to prepare, you can whip them up in just 30 minutes, perfect for last-minute gatherings. Versatile with any seasonal fruits, they cater to all tastes and preferences. Impressive yet simple, your guests will rave about these delightful treats!
Fruit Tartlets Ingredient List
For the Crust
- 1 cup all-purpose flour – This forms the base of your tartlets, providing structure and a delicate crumb.
- 1/2 cup butter (cold and cubed) – Cold butter ensures a flaky texture, making each bite melt in your mouth.
- 1/4 cup sugar – Adds a touch of sweetness to balance the tartness of the fruit filling.
- 1 large egg yolk – Helps bind the ingredients together while enriching the flavor of the crust.
For the Filling
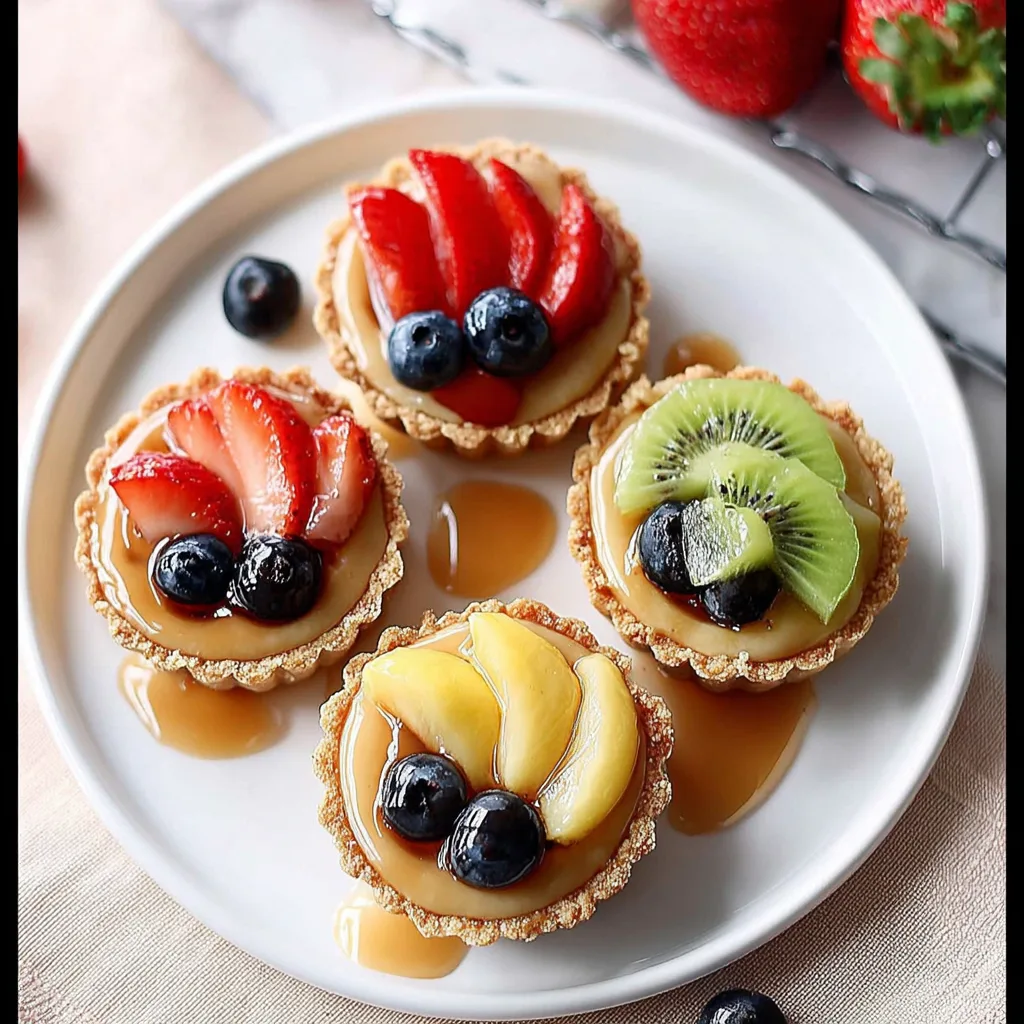
- 2 cups mixed fresh fruits (such as berries and kiwi) – Use a colorful mix to create visually appealing and delicious tartlets that burst with freshness.
- 1 cup whipped cream – This light and airy topping complements the vibrant fruits, adding a luscious finish to your Fruit Tartlets.
How to Make Fruit Tartlets
1. Combine Ingredients: In a mixing bowl, blend 1 cup of all-purpose flour, 1/2 cup of cold, cubed butter, and 1/4 cup of sugar until the mixture is crumbly. This creates a delightful base for your tartlets.
2. Press and Chill: Firmly press the crumbly mixture into tartlet pans, ensuring even coverage. Chill in the refrigerator for about 30 minutes to help set the crust’s shape.
3. Preheat Oven: While your crust chills, preheat your oven to 350°F (175°C). This temperature will ensure a perfectly baked crust that turns golden brown.
4. Bake Crusts: Bake the chilled crusts for approximately 15 minutes or until they turn a lovely golden color. Keep an eye on them to avoid over-baking!
For the Filling:
5. Fill with Whipped Cream: Once the crusts have cooled, generously fill each one with 1 cup of whipped cream. This creamy layer adds a luscious texture that complements the fruits beautifully.
6. Top with Fresh Fruits: Arrange 2 cups of mixed fresh fruits—think vibrant berries and juicy kiwi—on top of the whipped cream. This colorful topping not only looks stunning but also bursts with flavor!
7. Serve or Chill: Enjoy your fruit tartlets immediately for a fresh bite, or chill them until ready to serve for an even cooler treat.
Optional: Garnish with mint leaves for an extra touch of freshness!
Exact quantities are listed in the recipe card below.
Expert Tips
- Chill the Dough: Make sure to chill the crust mixture for at least 30 minutes; this helps prevent shrinkage during baking.
- Use Cold Butter: Ensure your butter is cold and cubed. This creates a flaky texture in your fruit tartlets, avoiding a dense crust.
- Don’t Overbake: Keep an eye on the crust while it bakes. Remove them as soon as they turn golden to prevent a hard texture.
- Fresh Fruits Only: Choose ripe, fresh fruits for the filling. Overripe or mushy fruits can spoil the taste and presentation of your fruit tartlets.
- Whip Cream Just Right: Avoid over-whipping the cream; it should be fluffy yet still spreadable, ensuring a light topping on your tartlets.
How to Store and Freeze Fruit Tartlets
- Room Temperature: Enjoy your Fruit Tartlets fresh for up to 2 hours at room temperature, but they are best served chilled to maintain that delightful texture.
- Fridge: Store any leftover Fruit Tartlets in an airtight container in the fridge for up to 3 days. This helps keep the crust crisp and the filling fresh.
- Freezer: For longer storage, freeze unassembled tartlet shells for up to 1 month. Once they’re filled with fruit and cream, they are best enjoyed fresh.
- Reheating: If you’ve stored your tartlet shells in the freezer, let them thaw in the fridge overnight before filling. Avoid reheating filled tartlets, as this can compromise their deliciousness.
Fruit Tartlets Your Way
Get creative and make this delightful recipe your own with these simple twists and substitutions!
- Gluten-Free: Substitute all-purpose flour with a 1:1 gluten-free flour blend for a deliciously inclusive crust. This swap allows everyone to enjoy the sweetness of these mini delights without missing out on flavor or texture.
- Nutty Flavor: Replace half of the all-purpose flour with almond flour for a rich, nutty twist. The almond flavor pairs beautifully with fresh fruits, adding an extra layer of warmth to each bite.
- Coconut Crust: Use unsweetened shredded coconut mixed with almond flour instead of regular flour for a tropical vibe. This change infuses your tartlets with a lovely coconut essence that complements the fruits beautifully.
- Chocolate Delight: Incorporate cocoa powder into the crust by replacing 2 tablespoons of flour for a chocolatey base. The chocolate adds both depth and indulgence, making every tartlet feel like a special treat.
- Honey Sweetener: Swap sugar with honey in the crust for a natural sweetness that enhances the overall flavor profile. This substitution not only adds sweetness but also brings out the natural flavors of your fresh fruit toppings.
- Cream Cheese Filling: Mix in softened cream cheese with whipped cream for a richer filling. This variation creates a delightful tangy contrast to the sweet fruits, elevating your dessert to new heights.
- Spiced Crust: Add cinnamon or cardamom to your crust mixture for an aromatic twist. These warm spices create an inviting scent and taste that perfectly complement the freshness of the fruit.
- Savory Version: For an unexpected treat, use herbs like rosemary or thyme in your crust for a savory approach. This unique take can turn your tartlets into an appetizer sensation, perfect for entertaining!
Make Ahead Options
Preparing these delightful Fruit Tartlets is a breeze and perfect for meal prep, allowing you to enjoy their fresh flavors with minimal stress. You can make the crust up to 24 hours in advance by combining 1 cup of all-purpose flour, 1/2 cup cold cubed butter, and 1/4 cup sugar until crumbly. After pressing the mixture into tartlet pans and chilling for 30 minutes, bake them at 350°F (175°C) for about 15 minutes or until golden. While the crust cools, whip your cream in advance—this can also be done a day ahead—and store it in the fridge. On the day of serving, simply fill the cooled crusts with whipped cream, top them with 2 cups of mixed fresh fruits like berries and kiwi, and they’re ready to impress! For optimal freshness and texture, assemble your Fruit Tartlets just before serving or chill them for up to 3 hours beforehand. Enjoy the time-saving benefits while savoring these mini masterpieces!
Fruit Tartlets Questions Answered
What type of flour works best for the crust?
I recommend using all-purpose flour for this recipe, as it provides the perfect balance of structure and tenderness. If you want a gluten-free option, you can substitute it with a 1: 1 gluten-free flour blend, although the texture might vary slightly.
How long can I store leftover fruit tartlets?
These delightful tartlets can be stored in the refrigerator for up to 2 days. However, it’s best to eat them fresh to enjoy the crispness of the crust and the freshness of the fruit. If storing, keep them covered to prevent drying out.
Can I freeze fruit tartlets?
While freezing is not ideal for these tartlets due to their delicate nature and fresh ingredients, you can freeze the baked crusts. Just pre-bake them as directed, then allow them to cool completely before wrapping tightly in plastic wrap and storing in the freezer for up to a month. When you’re ready, simply thaw and fill with whipped cream and fruit!
What should I do if my crust is too crumbly?
If your crust mixture feels too crumbly and doesn’t hold together when pressed into the tartlet pans, try adding a teaspoon of cold water or more egg yolk until it reaches a dough-like consistency. Remember to keep your butter cold; this will help achieve that flaky texture!
What fruits pair well with these tartlets?
The beauty of these fruit tartlets lies in their versatility! While mixed berries and kiwi are fantastic choices, feel free to get creative—sliced peaches, mangoes, or even citrus segments add a delightful twist. Just make sure any fruits you use are ripe and sweet for that burst of flavor!
How many servings does this recipe yield?
This recipe yields 4 delicious mini fruit tartlets. Each serving packs around 250 calories, making them a delightful treat that’s both satisfying and light! Perfect for sharing at gatherings or enjoying as an indulgent dessert after dinner.