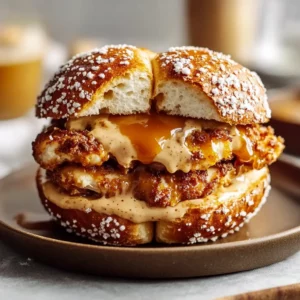
Imagine sinking your teeth into a warm, golden Cheesy Garlic Butter Rollup, where each bite bursts with the irresistible flavors of melted cheese and fragrant garlic. The soft, pillowy texture cradles a buttery filling that dances on your taste buds, making it impossible to resist reaching for just one more.
These rollups are not just a snack; they evoke memories of cozy gatherings with friends and family, where laughter fills the air and the aroma of baking garlic fills the kitchen. Perfect for game days or casual get-togethers, these delightful treats promise an amazing flavor experience that will have everyone asking for the recipe.
Why Is Cheesy Garlic Butter Rollups So Irresistibly Good?
Deliciously cheesy and packed with flavor, these rollups are a treat that everyone will adore. Quick to prepare, you can whip them up in just 35 minutes, making them perfect for unexpected guests. Versatile options allow you to customize fillings or serve them as an appetizer or snack. Golden brown perfection ensures they look as good as they taste, while the buttery garlic aroma will fill your kitchen with warmth. Crowd-pleaser appeal means they’re guaranteed to be a hit at any gathering!
Ingredients for Cheesy Garlic Butter Rollups
- For the Dough
- 1 package Pizza Dough – This will serve as the perfect base for your delicious rollups.
- For the Filling
- 1/2 cup Butter (softened) – Softened butter blends beautifully with garlic for a rich flavor.
- 3 cloves Garlic (minced) – Fresh minced garlic infuses these rollups with irresistible aroma and taste.
- 1 cup Cheese (shredded) – Use your favorite cheese for a melty, gooey filling that everyone will love.
How to Make Cheesy Garlic Butter Rollups
1. Preheat the oven to 375°F (190°C).
Get that oven nice and warm, as it will help our rollups bake to a perfect golden brown.
2. Mix the filling ingredients.
In a mixing bowl, combine 1/2 cup of softened butter, 3 cloves of minced garlic, and 1 cup of shredded cheese. This fragrant mixture will elevate your rollups!
3. Roll out the pizza dough.
Take your package of pizza dough and roll it out on a lightly floured surface. Cut it into rectangles, ensuring they’re big enough for a generous spoonful of filling.
4. Spoon the filling onto each rectangle.
Place a spoonful of that delicious cheesy garlic butter mixture onto each piece of dough. Don’t be shy—make sure it’s well-filled for maximum flavor!
5. Roll up each rectangle tightly.
Carefully roll up each dough rectangle around the filling, securing it nicely to keep all that cheesy goodness inside.
6. Place the rollups on a baking sheet.
Arrange your rollups on a baking sheet lined with parchment paper, giving them space to expand while they bake.
7. Bake in the oven for 20 minutes or until golden brown.
Pop them in the preheated oven and let them transform into delicious golden bites, filling your kitchen with mouthwatering aromas.
Optional: Serve warm with marinara sauce for dipping!
Exact quantities are listed in the recipe card below.
Expert Tips
- Dough Thickness: Roll the pizza dough to about 1/4 inch thick for optimal cooking time and a nice bite.
- Filling Distribution: Don’t overfill each rectangle; a spoonful is perfect. Too much filling can cause them to burst while baking.
- Butter Softness: Ensure your butter is softened but not melted. This helps create a creamy filling without excess grease.
- Baking Sheet Prep: Line your baking sheet with parchment paper for easy cleanup and to prevent sticking during baking.
- Golden Brown Indicator: Keep an eye on the rollups; they should be golden brown after 20 minutes, but ovens may vary in heat.
These tips will help you create delightful Cheesy Garlic Butter Rollups that your family will adore!
How to Store and Freeze Cheesy Garlic Butter Rollups

- Room Temperature: Enjoy your Cheesy Garlic Butter Rollups fresh for up to 2 hours at room temperature before they should be stored in the fridge.
- Fridge: Store leftover rollups in an airtight container for up to 3 days. Reheat in the oven at 350°F (175°C) for about 10 minutes for best results.
- Freezer: For longer storage, freeze the rollups individually wrapped in plastic wrap, then place them in a freezer bag for up to 2 months. Thaw overnight in the fridge before reheating.
- Reheating: To bring back that delicious freshness, reheat thawed rollups in a preheated oven at 350°F (175°C) for about 10-15 minutes until warm and cheesy.
Cheesy Garlic Butter Rollups Variations
Feel free to get creative and tailor these rollups to suit your taste buds and dietary needs!
- Herbed Delight: Mix in fresh herbs like parsley or basil for an aromatic twist. These fragrant additions elevate the flavor profile, making each bite a burst of freshness.
- Spicy Kick: Add red pepper flakes or diced jalapeños for some heat. This fiery twist will tantalize your palate, perfect for those who love a little spice in their snacks.
- Meaty Option: Incorporate cooked and crumbled bacon or sausage into the filling. This savory addition makes the rollups heartier, turning them into a satisfying treat.
- Veggie Boost: Toss in finely chopped spinach or roasted bell peppers for extra nutrition. The added veggies not only provide color but also enhance the texture and flavor of your rollups.
- Cheese Variety: Experiment with different cheeses like mozzarella, cheddar, or feta. Each cheese brings its unique character, allowing you to discover new favorites with every bake.
- Sweet Surprise: For a dessert version, mix in cinnamon and sugar instead of garlic. Drizzle with honey after baking for a delightful sweet treat that’s sure to impress.
- Gluten-Free Dough: Use gluten-free pizza dough to accommodate dietary restrictions. This swap ensures everyone can enjoy these delicious rollups without compromise.
- Nutty Flavors: Add a sprinkle of toasted pine nuts or walnuts for crunch. This delightful texture contrast takes your cheesy rollups to another level of deliciousness!
Make Ahead Options
Cheesy Garlic Butter Rollups are perfect for meal prep, allowing you to enjoy this delightful appetizer whenever the craving strikes. You can prepare the filling using 1/2 cup of softened butter, 3 cloves of minced garlic, and 1 cup of shredded cheese up to 3 days in advance. Simply mix these ingredients and store them in an airtight container in the refrigerator. Additionally, you can roll out the pizza dough and cut it into rectangles a day ahead of time. When you’re ready to serve, just assemble the rollups by placing a spoonful of the filling on each rectangle, rolling them up, and baking at 375°F (190°C) for about 20 minutes until golden brown. This way, you save time and still enjoy fresh Cheesy Garlic Butter Rollups that are bursting with flavor!
Cheesy Garlic Butter Rollups Recipe FAQs
What type of pizza dough should I use for Cheesy Garlic Butter Rollups?
You can use store-bought pizza dough for convenience, but feel free to make your own if you’re up for it! Look for a dough that’s soft and pliable, as it will make rolling the fillable rectangles much easier.
Can I substitute the cheese in the filling?
Absolutely! While I recommend a good melting cheese like mozzarella for that gooey texture, you can also try cheddar, gouda, or a blend of your favorites. Just keep in mind that stronger cheeses may alter the flavor profile slightly.
How do I store leftover rollups?
If you have any rollups left, let them cool completely before placing them in an airtight container. They’ll stay fresh in the fridge for about 3 days. Reheat them in the oven at 350°F (175°C) for about 10 minutes to regain their crispy texture!
Can I freeze Cheesy Garlic Butter Rollups?
Yes! These rollups freeze beautifully. After baking and cooling, wrap them tightly in plastic wrap and then place them in a freezer-safe bag. They can be stored for up to 2 months. When you’re ready to enjoy them, just bake directly from frozen at 375°F (190°C) for about 25-30 minutes.
What’s the best way to ensure my rollups are golden brown?
To achieve that beautiful golden brown color, make sure your oven is preheated to 375°F (190°C) before putting the rollups in. You can also brush them lightly with melted butter before baking—this adds flavor and enhances browning.
How many servings do these rollups provide?
This recipe yields about 4 servings, with each serving containing approximately 250 calories. They make a fantastic appetizer or snack that’s perfect for sharing—or not!

Cheesy Garlic Butter Rollups
Ingredients
Method
- Preheat the oven to 375°F (190°C).
- In a mixing bowl, combine softened butter, minced garlic, and shredded cheese.
- Roll out the pizza dough and cut it into rectangles.
- Place a spoonful of the filling on each rectangle and roll them up.
- Place the rollups on a baking sheet and bake for 20 minutes or until golden brown.